How To Make an Effective Rain Barrel for Your Home Garden
Water is an abundant resource in Michigan; we are blessed with fresh water lakes surrounding our state. We have numerous waterways such as rivers and streams too- even waterfalls in the UP. But with all this water it is easy to forget how much we need water- and how much the population of the world is hurting for clean, drinkable water. Water is a finite resource to a great extent- it is hard to create new fresh water, so why then are there so many pollutants added to this life giving resource?
Storm water runoff is a huge contributor to waterway pollution in West Michigan. Think of all the ‘toxic gick’ that rainwater streams through- the industrial fertilizers, toxic material from roads, and all sorts of chemicals from lawns; all of this untreated rainwater is then returned to the watershed, polluting nearby streams, rivers and lakes. One cheap and effective way for reducing storm water runoff is to build a rain barrel to catch the rain directly for use in a home garden, flowerbed or lawn.
I was fortunate enough to be able to attend a workshop to create a rain barrel thanks to WMEAC (West Michigan Environmental Action Council). The fee for one barrel was $25.00 and the making of this barrel took less than an hour. With some simple tools and a few common plumbing parts the barrel was a snap to make- even a rookie like me who is not handy in the least had an easy time putting this all together. WMEAC sources their barrels through the Coke bottling plant in downtown Grand Rapids. These barrels are 55-gallon food grade plastic barrels- food grade is important as you want your barrel to not have any harsh chemical residue that could poison and kill whatever you are using the water for.
Some prep work was done for workshop attendees in advance- two holes were drilled with a threaded hole saw to fit the 3/4” plumbing nipples and one of the two caps at the top of the barrel was removed. These holes were drilled for the overflow hose (at the top of the barrel) and the regular water hose (at the bottom of the barrel).
 There were 4 basic pieces of hardware used: two 3/4”x2” steel pipe nipples, one 3/4”x3/4” hose adapter and one y-connector hose adaptor. The only other things used were a fine mesh screen to keep mosquitoes and debris out of the barrel, a zip tie and some silicon sealer. There was a big turnout for the workshop and we all shared tools- assorted wrenches and three tubes of sealer.

Only screwed half way in for now.
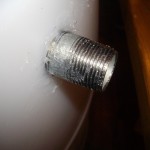
The nipple is then screwed in flush with the silicon sealant coating the threads.

The mesh netting attached tightly over the open hole with a zip tie.

Hose adapter with y- connector screwed on.
After you finish your rain barrel you will need to set it up somewhere off of the ground. You can use pavers or cement- whatever is sturdy enough to hold up a 500lb barrel of water (when full).Also make sure your set up allows you to easily access the hose and try to find a fairly sheltered spot. If your gutters are nice and catch a good amount of rain, then attaching an elbow piece to your gutter would ensure the rain water makes it to the barrel. However, make sure your gutters are in good repair so the maximum amount of rainwater can fill your rain barrel!
A rain barrel is a great way to reduce or even eliminate the cost of watering your garden or tender seedlings. And plants do best when their roots can drink in rainwater- your plants will be vigorous and productive. At such little cost and ease you could have a rain barrel too.


